· tutorials · 4 min read
Exploring Network Events in Automize - Part 2
Welcome to the second part of our series on using Automize. In this segment, we will delve into the network tab features, enabling you to interact with network events and understand how to manipulate requests and responses effectively. This guide will equip you with the knowledge to maximize your automation tasks.
This blog was generated from a tutorial video you can watch here
Accessing the Network Tab
To begin, accessing the Automize tool is straightforward. You can right-click anywhere on your browser, select “Inspect Element,” and then click on the Automize plug-in symbol. This will open up the Automize interface, where you can find the network tab. It is essential to note that initially, you may see no network events listed.
In our example, we will work with a test website designed to demonstrate network requests. The site includes a header value and a text input to request a specific number of colors. Once the network request is made, the results appear both in the Automize tab and the network tab of your browser.
Understanding Network Requests
When you make a network request, you will receive the number of colors you requested back from the server. For instance, if you request five colors, the response will echo that number back. The request header will also show a custom message, such as “I love Automize,” and the server will reply with a similar header, along with a Boolean indicating access status.
- Request header: “I love Automize”
- Response header: “Hello from the server”
- Access status: false
This interaction illustrates how headers work in network requests and responses. The request payload includes the color count, which directly influences the output.
Handling Different Languages
It is crucial to understand how Automize handles various programming languages. If you select CSS, for example, you will find that it does not support network events. However, if you switch to regular JavaScript, you might encounter some limitations due to the fetch client JavaScript structure.
For more advanced users, you can copy the request and test it directly in your browser. This flexibility allows you to explore the response data without being constrained by the Automize interface.
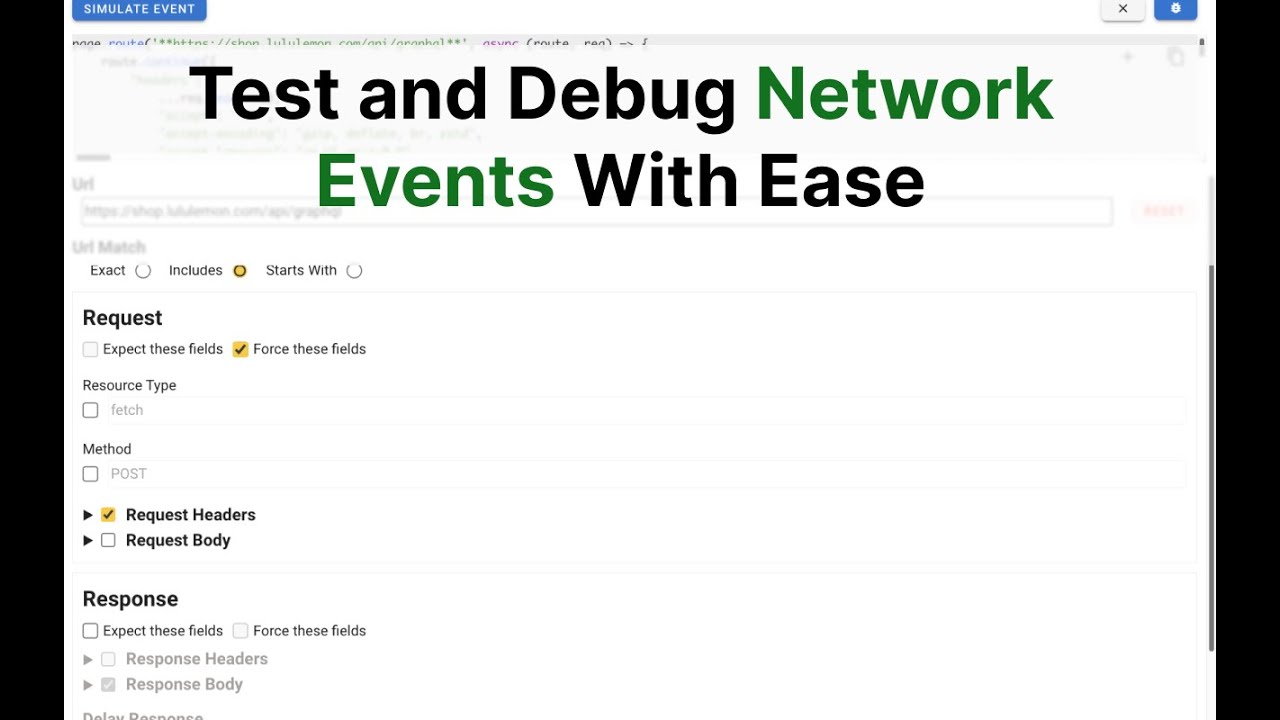
Using Playwright for Requests
While you can use JavaScript for making requests, leveraging Playwright can streamline the process. Playwright offers a user-friendly way to manage requests and responses. You can specify URLs, match patterns, and force responses that suit your testing needs.
Here’s how you can modify your request:
- Specify the URL
- Set matching parameters (includes or starts with)
- Force a response
For example, if you want to adjust the number of colors returned, you could set it to two colors instead of five. You can also introduce a delay in the response to simulate real-world conditions.
Simulating Network Events
One of the most powerful features of Automize is the ability to simulate network events. After configuring your request, you can use the “Simulate Event” button to test how your changes affect the network request in real-time.
When you simulate a request, you can observe the results directly in the browser’s network tab. If you set an artificial delay, such as two seconds, you will see how the request is processed over time.
Modifying Request Headers
Another valuable aspect of using Automize is the ability to modify request headers. You can change the header values to test different scenarios. For instance, if you decide to change the custom header from “I love Automize” to “I hate Automize,” this reflects how the server responds to altered input.
Here’s how to modify headers:
- Set new header values
- Intercept requests
- Remove headers entirely
By simulating these changes, you can see firsthand how the server echoes back what was sent, providing insights into the request-response cycle.
Removing Headers and Handling CORS
In some cases, you may want to remove specific headers from requests or responses. For example, you can set a header to null, effectively deleting it from the request. Understanding how to manage headers is crucial, especially when dealing with CORS (Cross-Origin Resource Sharing) issues.
When you remove CORS headers, you will likely encounter errors. This serves as a reminder of the importance of headers in network requests and how they can impact your application’s functionality.
Conclusion and Next Steps
In this part of our Automize series, we’ve explored the network tab’s capabilities, focusing on making and manipulating network requests. By understanding how to use the tools available, you can improve your automation tasks and streamline your workflows.
As you continue to experiment with Automize, remember that the ability to simulate events and modify requests can open new avenues for testing and development. If you have any questions or suggestions for future topics, please feel free to share in the comments.
Stay tuned for part three, where we will dive deeper into more advanced features of Automize!