· tutorials · 4 min read
Getting Started with Automize A Comprehensive Guide
Automize is a powerful tool designed to streamline the process of web automation. Whether you are a developer looking to scrape data or test web applications, understanding the fundamentals of Automize can significantly enhance your productivity. In this guide, we will explore the core features of Automize, how to navigate its interface, and best practices for selecting elements and generating code.
This blog was generated from a tutorial video you can watch here
Installation and Accessing Automize
Before diving into the features of Automize, it’s essential to ensure that you have it installed as a browser plugin. You can access Automize in two main ways:
- Right-click on the page and select “Inspect.”
- Press the F12 key on your keyboard.
Both methods will open the inspect element panel in your web browser. Depending on your preference, you can choose to position this panel on either the right side or the bottom of your screen. This flexibility allows you to maximize your workspace.
Initial Setup and Interface Overview
Upon opening Automize for the first time, you will be prompted to select a programming language. JavaScript is a common choice due to its straightforward syntax and wide usage in web development. You can also switch to other languages as needed.
Once you’ve made your selection, you’ll be taken to the main interface. This interface closely resembles the console or elements screen in your browser. Familiarizing yourself with the top row of buttons is crucial, as they offer essential functionalities:
- Clear Selection: Deselects any highlighted elements.
- Refresh: Reloads Automize, ensuring you have the latest updates.
- Toggle Quick Select Mode: Enables or disables an easy selection feature.
Selecting Elements with Automize
The primary use case for Automize is selecting elements from a webpage. To do this, follow these steps:
- Activate the selector by clicking on the designated button.
- Click on the desired element on the webpage.
- Automize will automatically generate a selector for the element.
This feature is particularly useful for scraping websites or writing automated tests. Automize is intelligent enough to provide a good selector based on the element you clicked. This efficiency saves you time and effort while scripting.
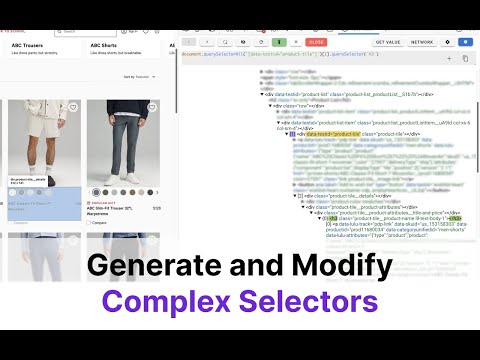
Working with Code Generators
After selecting an element, Automize generates a code snippet that you can directly incorporate into your scripts. For instance, if you selected a search button, the generated code might look something like this:
Example Code:
document.querySelector('button.search')
This code snippet can be modified and tailored to fit your needs. If you prefer a different syntax, such as CSS selectors, you can easily switch the language within Automize.
Handling AI Selection Errors
Sometimes, Automize may generate multiple selections or encounter errors in selecting the correct element. In such cases, you can:
- Refresh the selection.
- Click on the element again for a more precise selection.
- Turn off quick select mode to fine-tune your choices.
These adjustments allow you to accurately pinpoint the desired element, ensuring your scripts function as intended.
Retrieving Content from Elements
In addition to selecting elements, Automize enables you to retrieve content from them easily. This is particularly useful for extracting text or values from input fields. To get the inner text of an element, simply:
- Select the element.
- Click on “Get Value in Text.”
Automize will append the necessary code to fetch the inner text, which you can then use in your scripts. For example:
Generated Code: document.querySelector(
header).innerText
This feature is a significant time-saver, especially when working with complex scripts or unfamiliar languages.
Automating User Interactions
With Automize, you can simulate user interactions such as clicking buttons or filling out forms. In scripting languages like Playwright, you can perform various actions:
- Click elements.
- Hover over items.
- Expect certain values to be present.
For example, if you want to test that a button has a specific value, you can use the generated code to assert this expectation. This level of interaction allows for comprehensive testing and automation of web applications.
Best Practices for Using Automize
To maximize your experience with Automize, consider the following best practices:
- Familiarize yourself with the interface.
- Experiment with different languages.
- Utilize the refresh and clear buttons frequently.
- Regularly save your code snippets for future use.
- Keep your selections precise to avoid errors.
By following these guidelines, you can enhance your productivity and reduce the likelihood of encountering issues during automation tasks.
Conclusion: Unlocking the Power of Automize
Automize is an invaluable tool for anyone involved in web development or automation. Its robust features, user-friendly interface, and intelligent selectors make it a go-to option for both beginners and seasoned developers. By mastering the basics outlined in this guide, you can leverage Automize to improve your workflow, automate repetitive tasks, and ultimately save time.
As you continue to explore Automize, keep an eye out for additional resources and tutorials that can provide deeper insights into advanced functionalities. Happy automating!