· tutorials · 3 min read
Getting Started with Automize - Your Essential Guide
Welcome to Automize, your go-to solution for efficient web automation! In this guide, we will walk you through the basic functionalities and features of Automize so you can hit the ground running.
This blog was generated from a tutorial video you can watch here
Installation and Accessing Automize
If you haven’t installed Automize yet, you can easily do so through your browser’s plugins. Once installed, access Automize by either right-clicking on your web page and selecting Inspect, or simply pressing F12 on your keyboard. A familiar console will pop up where you can start working with Automize.
Setting Up Your Environment
After launching Automize, you’ll be greeted by a screen prompting you to choose your preferred programming language. For this demonstration, we’ll stick with JavaScript as it is straightforward and user-friendly. You can also toggle between different display options to suit your workspace preferences—opt for the layout that gives you more space to work, whether that’s on the right side or at the bottom of your screen.
Navigating the Interface
The primary interface mirrors the elements panel you’re accustomed to. At the top, you’ll notice several buttons, including a refresh button that resets Automize if you happen to encounter any issues.
One button you’ll find yourself using frequently is the clear button, which allows you to clear your element selection quickly.
Selecting Elements
The primary functionality of Automize revolves around element selection. Say you want to quickly generate code for a specific element, like a search button. By clicking on the selector tool in Automize, you can easily highlight and select elements on the page. Once you click on your desired element, Automize will automatically generate a selector for it.
Advanced Selection Techniques
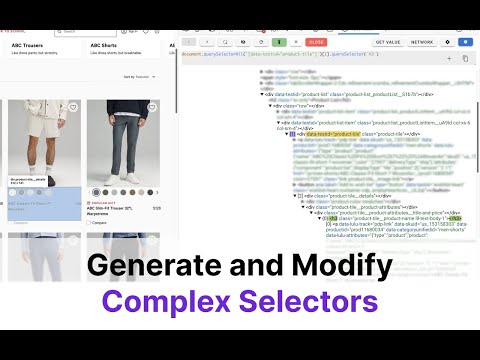
Sometimes, you may need more precision when selecting elements. Turning off the quick select mode lets you interact more closely with the DOM, ensuring that you can select exactly what you need. For example, if you’re targeting a search button contained within a specific <div>, you can click through the various parent elements to find the right selector.
Working with Values and Text
Automize is not only great for selecting elements but also excels in retrieving and manipulating content. You can easily get the inner text or values from elements on the page. This feature comes in handy when you need to validate that your webpage contains the correct information or when executing tests.
For instance, if you want to retrieve the text from a search button, you simply press the Get Value button. Automize will append the necessary code for you, which can be handy for developers who may not have every method memorized.
Interactivity Features
In addition to content retrieval, Automize lets you interact with elements through your scripts. You can simulate clicks, hovers, and even make assertions about the status of various UI elements. This means you can integrate Automize seamlessly into your testing workflow.
As you start to build your scripts, simply copy the generated code from Automize into your workflow. Whether you’re writing a Puppeteer or Playwright script, the integration is clear and user-friendly.
Conclusion
That’s a quick overview of how to get started with Automize, a powerful tool for web automation. Stay tuned for our next video, where we will dive deeper into advanced features like our test automation runner and network events.
Thank you for watching, and have fun automating your tasks with Au